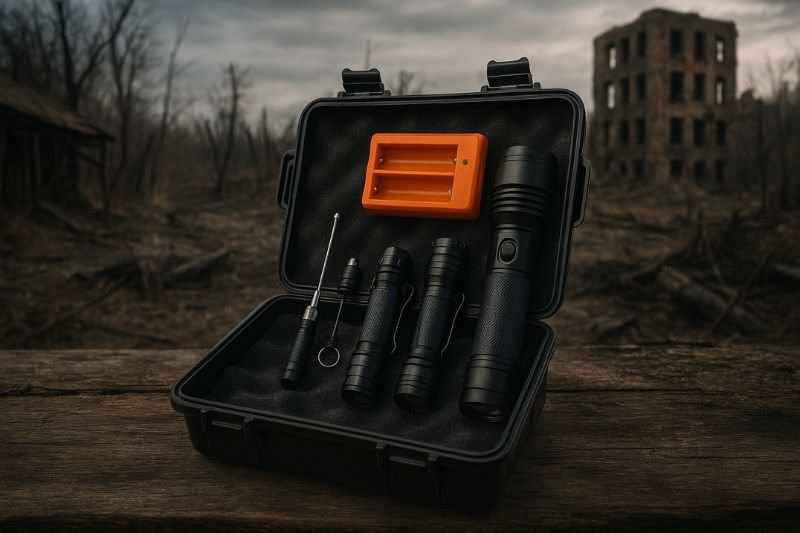
When it comes to survival essentials, the survival flashlight is often overlooked in favor of tools like knives or fire starters. But ask any seasoned prepper, and they’ll tell you: light is life. Whether you’re navigating a collapsed building, signaling for help, or defending your camp at night, a dependable flashlight can mean the difference between safety and chaos.
The Role of Light in Survival Scenarios
In a survival situation—urban, rural, or wilderness—darkness is a serious threat. It hides hazards, slows decision-making, and increases fear. Even your best instincts dull when you can’t see what’s around you. A survival flashlight restores control. It gives you range, direction, and—critically—psychological calm.
Whether you’re bugging out at night, inspecting shelter damage, or treating an injury after sundown, visibility is non-negotiable. Nighttime makes every task ten times harder. A reliable flashlight gives you a fighting chance.
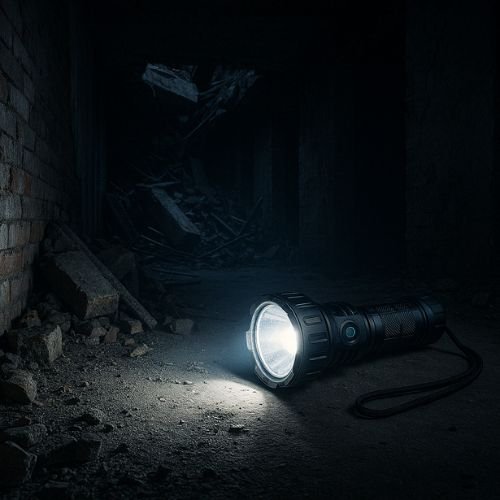
Flashlight vs. Headlamp vs. Lantern: Why a Flashlight Wins
Let’s be clear: headlamps and lanterns have their place. But the survival flashlight has three major advantages:
- 🔦 Directional power – lets you focus light exactly where you need it
- 💥 Tactical use – doubles as a weapon in close quarters
- ⚡ Versatility – easily handheld, clipped, mounted, or stored
In a high-stress scenario, you don’t want ambient light—you want control.
The Psychology of Light in Crisis
It’s easy to forget how deeply humans rely on light. In disaster psychology, darkness has a proven link to increased panic, paranoia, and disorientation. This is why FEMA and Ready.gov list lighting as a top-three emergency priority (after water and communication).
In blackout conditions, your flashlight isn’t just practical—it’s mentally stabilizing.
When Your Flashlight Is the Only Thing Working
Consider this scenario: a power outage after a cyberattack. No grid. No streetlights. Your phone’s dead, GPS is down, and you’re in a stairwell or underground parking lot. The only thing separating you from complete vulnerability is your flashlight.
But not just any flashlight—a survival-grade model with long battery life, strong beam intensity, and physical durability.
This isn’t the time to discover your plastic keychain light won’t cut it.
What Survivalists Look for in a Flashlight
Let’s talk about what sets a survival flashlight apart from your everyday household version. Here are the essential requirements:
1. Brightness (Measured in Lumens)
Survival flashlights should provide at least 300 lumens for effective outdoor use.
- 50–100 lumens: OK for indoor tasks
- 300–600 lumens: Reliable for navigation and signaling
- 1000+ lumens: Tactical level (can temporarily blind an attacker)
But brighter isn’t always better—beam control matters, especially in tight indoor spaces where bounceback can dazzle you.
2. Battery Type and Longevity
Choose between:
- AA/AAA batteries (widely available, but short runtime)
- Rechargeable lithium-ion (longer life, often USB-C compatible)
- Solar/crank hybrid (for total grid-down situations)
Smart survivalists keep a mix of both and prioritize dual-power models with multiple recharge options.
3. Build Quality
A survival flashlight should be:
- Made of aircraft-grade aluminum or strong composite
- Rated IPX7 or higher for water resistance
- Drop-tested (at least 1–2 meters)
- Sealed buttons to avoid grit/mud interference
Bonus: some models come with striking bezels—good for breaking glass or self-defense.
Real-Life Case: Puerto Rico Blackout (2017)
After Hurricane Maria, most of Puerto Rico was without power for months. Emergency services struggled. Looting escalated. Nighttime was dangerous. Survivors reported that the only reliable tool during those months was a good flashlight—especially those that could be recharged with solar kits during the day.
A prepper from San Juan recounted using a tactical flashlight not just for safety, but to trade for food and medicine. In crisis, gear becomes currency—and a high-quality flashlight becomes leverage.
Flashlight Features That Actually Matter
Let’s debunk some marketing nonsense. These are the features that genuinely help in survival:
- Strobe mode – for signaling or disorienting threats
- Low-power mode – to conserve battery overnight
- SOS mode – coded blinking to signal for rescue
- Tail switch – faster activation when wearing gloves
- Pocket clip / lanyard – keeps your light accessible at all times
Avoid:
- Flashlights with built-in radios (gimmicky, fragile)
- RGB LED modes (cool but unnecessary)
- “Zoom” flashlights (often less durable and waterproof)
Situational Use Cases
| Scenario | Recommended Specs |
|---|---|
| Urban blackout | 400–800 lumens, wide beam, strobe mode |
| Wilderness survival | 600+ lumens, waterproof, red LED mode |
| Home defense (bug-in) | 1000 lumens+, strike bezel, fast switch |
| Car emergency kit | Compact, 2 battery types, magnetic base |
Redundancy: One Flashlight Isn’t Enough
The golden rule of prepping is: two is one, and one is none. Your survival flashlight may fail, fall, or get stolen. Always carry:
- 1 main flashlight
- 1 backup (smaller or headlamp)
- 1 crank/solar unit stored in your bug out bag
Light failure during a storm, riot, or long trek can be disastrous. Build your kit accordingly.
To Wrap This Up…
In survival, light is power. A survival flashlight isn’t a luxury—it’s a lifeline. From small decisions (choosing a path) to major ones (evading a threat), visibility defines your odds of success.
If you’re building or upgrading your gear, start with your flashlight. You’ll thank yourself when the grid goes dark.
How to Evaluate Flashlight Specs Like a Pro
Choosing a survival flashlight isn’t just about grabbing the biggest or brightest model. It’s about knowing exactly which specs matter in a real crisis, and how to interpret the numbers beyond marketing hype.
In this section, we’ll break down the key specifications, how they’re measured, and what they actually mean for preppers, off-grid explorers, and bug-out planners.
1. Lumens Aren’t Everything
Most flashlight ads boast about high lumens—like 1000, 2000, even 5000. But what are lumens, really?
Lumens = Total Light Output
It’s the total amount of visible light emitted.
- 100 lumens = candlelight in a room
- 300–600 lumens = strong for general outdoor use
- 1000+ lumens = tactical range or large-area illumination
But remember: more lumens = more battery drain. And in a survival situation, battery life often trumps brightness.
✅ Pro Tip: Choose a model with adjustable output modes (low, medium, high, strobe) rather than one with a fixed ultra-bright beam.
2. Beam Distance & Beam Pattern
Beam distance is measured in meters—how far the light reaches before dropping below 0.25 lux (the brightness of a full moon). It’s vital for:
- Navigating open terrain
- Spotting obstacles
- Signaling across long distances
But beam shape matters too. Two common types:
- Flood beam: wide, even light (best for campsites, interiors)
- Spot beam: narrow, concentrated light (great for distance)
Some flashlights allow dual-beam settings. Others let you adjust the focus manually—but be careful: zoom lenses reduce waterproof integrity.
✅ Look for a flashlight with fixed optics and multiple beam modes, not twist-focus mechanisms that break easily.
3. Runtime and Power Modes
Your flashlight is only as good as its battery endurance. Runtime is usually listed in hours—but always check under which mode it was tested.
For example:
“20 hours runtime” at low mode (30 lumens) is very different from 2 hours at high mode (1000 lumens).
Essential power modes to look for:
- 🔋 Low (5–50 lumens): map reading, tent light
- 🔆 Medium (100–300 lumens): night navigation
- 🌕 High (500+ lumens): emergency or signaling
- 🚨 Strobe/SOS: tactical, alert, or distress
✅ Emergency Use Rule: A reliable survival flashlight should run at least 8 hours on medium brightness—enough to get through a full night.
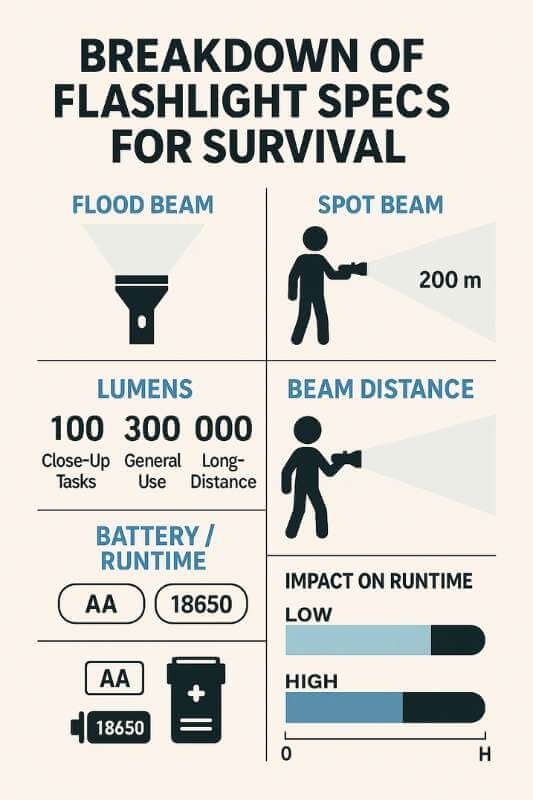
4. Battery Options: Know Your Trade-Offs
Primary (Disposable)
- AA / AAA: easy to find, limited capacity
- CR123A: powerful, cold-resistant, more expensive
Rechargeable
- 18650 Li-ion: high-capacity, commonly used
- 21700 Li-ion: newer, more energy-dense
- USB-C flashlights: increasingly common for solar kits
✅ Survival Tip: Look for a flashlight that accepts both rechargeable and disposable batteries, or one with a USB charging + backup battery tray.
5. Water & Impact Resistance: IP Ratings
Your flashlight might be dropped, rained on, frozen, or crushed. Make sure it’s certified to handle it.
IP Ratings (Ingress Protection)
- IPX4 – Splash-proof (not immersion)
- IPX6 – Strong rain and jets of water
- IPX7 – Waterproof (submersible up to 1 meter)
- IPX8 – Waterproof beyond 1 meter (dive lights)
✅ Minimum for survival: IPX6 or higher
Drop Test Ratings
Measured in meters.
A good survival flashlight should survive at least 1-meter drop onto concrete.
✅ Look for ANSI FL1 certifications for drop and water resistance, which ensures standardized third-party testing.
6. Switches and Controls
In survival, gloves, stress, or injury can make precise handling impossible. That’s why the control layout is just as important as the tech inside.
Must-Have Switch Features:
- Tail switch – easy to locate and use in darkness
- Momentary-on – press for light without full click
- Lockout mode – avoids accidental activation in bags
- Memory mode – remembers your last setting
✅ Test the interface: can you toggle modes with one hand, in the dark, while wearing gloves? If not, it’s not survival-ready.
7. Size and Weight: Bigger Isn’t Always Better
Sure, a big flashlight might seem more powerful, but it can weigh you down in a pack. Size affects:
- Carryability (belt, molle strap, pocket)
- Use in tight spaces (vehicle, shelter)
- Balance in your hand for striking
📏 Ideal survival flashlight:
- Between 5″ and 7″ long
- Weight: under 250g (with batteries)
- Fits in hand without extending past grip
✅ Bonus: Look for flat bases (can stand vertically) and magnetic tailcaps (attach to metal surfaces for hands-free lighting).
8. Durability and Build Material
Not all “tactical” flashlights are truly tough. Look for real-world build specs:
| Material | Pros | Cons |
|---|---|---|
| Plastic | Lightweight, cheap | Fragile, poor water resistance |
| Aluminum | Durable, rust-proof, common | Gets cold in winter |
| Stainless steel | Ultra-durable, impact-resistant | Heavy |
| Titanium | Strong + light | Expensive |
✅ Best all-around: Aircraft-grade anodized aluminum (Type III)
9. Certifications and Standards
Don’t trust random specs from Amazon descriptions. Look for the ANSI/NEMA FL1 standard. It guarantees:
- Verified lumens and runtime
- Verified impact resistance
- Verified water resistance
- Standardized testing methods
✅ If it doesn’t show FL1 icons on the packaging, the specs may be unreliable.
In Summary
Choosing a survival flashlight isn’t just about brightness or brand—it’s about knowing what you’ll need when the world goes dark.
From beam quality to battery systems and water resistance, every spec must serve a survival purpose. When lives are on the line, you don’t want guesswork. You want tested, reliable, and smartly chosen gear.
Top Use Cases and How to Build the Perfect Flashlight Kit
Choosing a great survival flashlight is only the first step. In real-world survival, one light source isn’t enough. The goal is to build a resilient lighting system tailored to specific scenarios—urban, rural, vehicle-based, off-grid, or even long-term disaster.
Let’s dive into the core use cases, explore how flashlights function differently in each, and show you how to assemble a dependable multi-tiered flashlight kit that leaves no blind spot in your preparedness plan.
🔦 Flashlight Roles in Survival: Not All Lights Are Equal
In preparedness circles, every piece of gear must serve a purpose. Flashlights are no exception. A true survivalist builds redundancy and efficiency into their lighting plan.
Here are the five main roles a flashlight can play:
- Everyday Carry (EDC)
- Bug-Out Bag (BOB)
- Get-Home Bag (GHB)
- Shelter/Off-Grid Base Use
- Tactical / Self-Defense Lighting
Each of these has specific requirements. Let’s explore them one by one.
1. EDC Flashlight: Your Daily Companion
An EDC flashlight is the one you carry everywhere—pocket, keychain, or clipped to your belt. Its role? Handle spontaneous blackouts, parking lot scans, or quick emergency checks.
Ideal Features:
- Max 4–5 inches long
- 150–400 lumens
- USB-rechargeable or AA compatible
- Tail switch or side switch for quick use
- Water resistant (IPX6+)
✅ Recommended: A lightweight model with both high and low modes, pocket clip, and lockout function. Don’t underestimate the usefulness of a compact light in everyday emergencies.
2. Bug-Out Bag (BOB) Flashlight: The Workhorse
Your BOB flashlight must be ultra-reliable, tough, and able to function for days without recharge. This is your primary light when on the move, often in unpredictable or dangerous environments.
Ideal Features:
- 600–1000 lumens, with adjustable brightness
- Dual battery compatibility (rechargeable + AA backup)
- Waterproof (IPX7 minimum)
- Strike bezel for self-defense
- Strobe/SOS modes
- Long runtime (8–24 hours on medium mode)
✅ Add-ons: Store extra batteries in a waterproof case; include a mini solar charger or power bank if your flashlight has USB charging.
3. Get-Home Bag (GHB) Flashlight: Compact and Efficient
The GHB is for one purpose: getting you home during a crisis. It stays in your office, car, or locker. Your GHB flashlight should balance performance, weight, and concealment.
Ideal Features:
- 300–600 lumens
- Beam throw up to 150 meters
- Rechargeable or solar-crank backup
- Discreet carry design
- Magnetic base (hands-free lighting in cars)
✅ Bonus Tip: Consider including a mini clip-on red light to preserve night vision without drawing attention.
4. Home or Shelter Lighting: Comfort Meets Endurance
During long-term grid-down scenarios, your flashlight must serve broader needs: lighting rooms, cooking, repairing gear, and providing emotional comfort.
Ideal Setup:
- 1 powerful main flashlight (1000+ lumens)
- 1 flood-beam light for area illumination
- 1 lantern-style flashlight for room lighting
- Headlamp as hands-free backup
✅ Must-Have Features:
- Adjustable brightness
- Long runtime (especially on low)
- Ability to stand upright or mount
- Solar recharge options
- USB output (some flashlights can also charge other devices)
5. Tactical Flashlight: Defense and Signaling
This isn’t just for law enforcement. In a survival scenario, you may need a flashlight that doubles as a non-lethal deterrent, or a rescue signaling device.
Tactical Features:
- 1000+ lumens (blinding power)
- Strike bezel (for window breaks or self-defense)
- Tail switch with momentary-on
- Instant strobe and SOS
- Impact-resistant (1.5m+)
- Waterproof and dustproof (IPX8 preferred)
✅ Use in combo with firearm grip, or as a standalone defense tool. Many tactical flashlights also fit MOLLE gear or belt sheaths.
🧠 Building Your Redundant Flashlight Kit (Layered System)
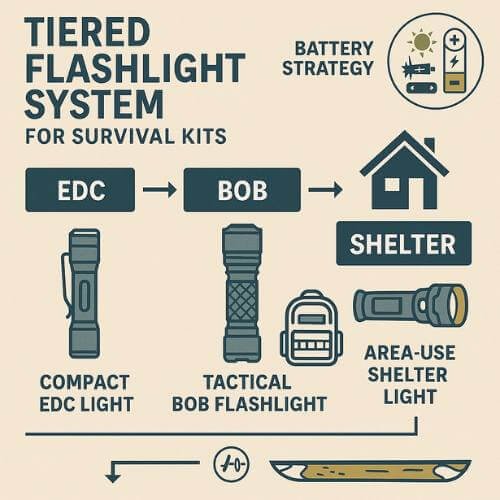
One flashlight isn’t a system. You need multiple lights tailored to your environment, mobility, and risk profile.
Here’s how to build a 3-tier flashlight setup:
| Tier | Use Case | Example Light Type | Stored In |
|---|---|---|---|
| Primary | Bug-out / Field use | Tactical 1000+ lumens | Bug-Out Bag (BOB) |
| Secondary | Shelter / camp / backup | Flood-beam or lantern light | Off-grid Base / Home Kit |
| Tertiary | EDC or minimalist backup | Compact penlight or keychain | Pocket / Jacket |
✅ Optional 4th Tier: Headlamp – hands-free lighting for repairs, cooking, or medical emergencies.
🔋 Battery Strategy: Don’t Get Caught in the Dark
A solid flashlight kit needs a battery management strategy. Use a battery matrix to diversify energy sources:
| Battery Type | Flashlight Role | Backup Strategy |
|---|---|---|
| AA / AAA | EDC / GHB | Easily stocked, buy in bulk |
| 18650 / 21700 | Tactical / Primary light | Rechargeable via solar or USB bank |
| CR123A | Cold weather / backup | Long shelf life |
| Solar + crank | Emergency base lighting | Infinite power when maintained |
✅ Store spare batteries in waterproof cases with silica packets to prevent corrosion.
Mistakes to Avoid When Building a Flashlight Kit
- ❌ Relying on just one flashlight
- ❌ Choosing lights without physical buttons (hard to use with gloves)
- ❌ Ignoring beam type (spot vs flood)
- ❌ Skipping manual testing before packing
- ❌ Forgetting spare batteries or chargers
✅ Always test all flashlights every 2–3 months, and rotate rechargeable units to keep batteries healthy.
Final Words: Light Is Strategy
Building the right survival flashlight kit is more than a prepper checklist—it’s a strategy for control, confidence, and safety. Light isn’t just illumination. It’s navigation. It’s security. It’s peace of mind in the face of chaos.
Your gear tells the story of your preparedness. Don’t let it fail when everything else does.
❓ Frequently Asked Questions (FAQ)
🔦 What is the ideal brightness (in lumens) for a survival flashlight?
There’s no universal answer, but for most survival situations, a flashlight offering between 300 and 1000 lumens covers all bases.
- 300–600 lumens is optimal for general tasks like navigating terrain or reading maps.
- 1000+ lumens is ideal for tactical use or long-range visibility.
The real key is adjustability. A flashlight with multiple brightness modes lets you conserve battery when needed and boost output only when necessary. Brightness alone doesn’t make a flashlight “survival-ready”—balance it with runtime and durability.
⚡ How important is battery type when choosing a survival flashlight?
Battery choice is critical. The best survival flashlight is the one that keeps working long after the power grid fails. There are three main battery systems:
- Disposable (AA, AAA, CR123A): Easy to stockpile but not rechargeable.
- Rechargeable (18650, 21700): Powerful and eco-friendly, but need a power source.
- Hybrid systems: The best survival lights support both types, or include USB + crank/solar options.
A good survivalist always plans for battery management. Keep a backup power bank or solar charger, and prioritize models that can run on multiple battery types.
🌧️ How waterproof does my flashlight really need to be?
Your flashlight should be at least IPX6 rated to survive heavy rain, snow, or brief splashes. For more extreme conditions like floods, river crossings, or boat evacuations, look for IPX7 or IPX8:
- IPX6 – Withstands strong water jets (rainstorms, sprays)
- IPX7 – Submersible up to 1 meter for 30 minutes
- IPX8 – Beyond 1 meter; ideal for water-based missions
Don’t just rely on claims like “water-resistant”—check for ANSI FL1 certification and real-world tests.
🧰 What features separate a tactical survival flashlight from a basic one?
A tactical survival flashlight is built for high-stress, defensive, and mission-critical tasks. It often includes:
- 1000+ lumens to disorient or blind attackers
- Strobe and SOS modes for signaling or defense
- Strike bezel for glass-breaking or hand-to-hand deterrent
- Tail switch for quick, one-handed activation
- Waterproof + impact resistance
While basic flashlights might offer brightness, tactical models are built to survive impacts, extreme weather, and combat-level stress. In survival, that robustness can save your life.
🏕️ How many flashlights should I include in my survival kit?
According to experienced preppers: two is one, one is none.
You should have at least:
- Primary flashlight (tactical-grade) in your Bug-Out Bag
- Secondary light (compact or EDC flashlight)
- Hands-free option (headlamp)
- Backups (crank or solar-rechargeable units) stored in base camp or vehicle
Flashlights are small but essential. Don’t rely on one. Build a redundant system to cover battery failure, water damage, or theft.
🧭 Can I use my phone flashlight in a survival situation?
In short: only as a last resort. Your phone flashlight was designed for brief use in controlled conditions—not extended darkness, wilderness trekking, or emergency signaling.
Risks of relying on your phone:
- It drains your phone battery fast
- Low brightness (compared to survival flashlights)
- Poor beam throw and durability
- Vulnerable to water, cold, and drops
Use your phone for communication or navigation if possible. Save flashlight duties for a dedicated, purpose-built survival flashlight.
🧠 What’s the smartest way to test my flashlight before a real emergency?
You don’t want your first test to happen in a disaster. Here’s a prepper checklist to verify your gear in advance:
- Fully charge the flashlight or insert fresh batteries.
- Test each mode (low, high, strobe, SOS).
- Drop it from 1 meter onto concrete—does it still work?
- Submerge it in water (if rated IPX7+)—check for leakage.
- Test in the dark—can you operate it with one hand and gloves?
- Store it for 30 days—does it still turn on?
- Check memory function: does it retain the last mode used?
Repeat this routine every 3 months, and always carry a second light during your test in case of failure.

